ODBC Data Import
Pro This data connector is only available in Visplore Professional.
Visplore can connect to databases via ODBC. All you need is an ODBC driver and, ideally, an ODBC data source ("DSN") configured in Windows. ODBC allows Visplore to load data from individual tables or views (that combine or transform multiple tables).
To further simplify the interaction with the database, one can configure so-called access masks for Visplore. These access masks result in a user-friendly dialog in Visplore, where the user can pick time ranges and choose to only load data from certain assets/categories.
Requirements and Setup
The following databases have been tested and are supported: PostgreSQL, Microsoft SQL Server, MySQL, Oracle, SAP Hana, IBM DB2, MongoDB, TimescaleDB, Vertica, Crate.IO, and QuasarDB. Other databases supporting ODBC may work as well.
To avoid having to enter database connection information more than once, we recommend registering an ODBC source.
Start the "ODBC Data Source Administrator (64-bit)" in the Windows start menu by typing "odbcad".
Configure a user DSN ("data source name") by clicking "Add...". Some databases (e.g. PostgreSQL) allow storing the password within a DSN to avoid having to enter the password more than once.
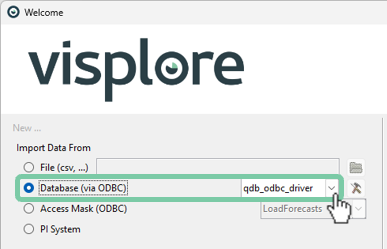
Once you configured your DSN, it appears as an option in the Welcome Dialog. Should you not see your DSN here, ensure that you used the 64-bit ODBC Data Source Administrator, as the 32-bit one does not show up in Visplore. Also, close (or restart) Visplore before the configuration of your DSN.
Should you choose not to configure an ODBC source in windows, you can specify a connection manually with the "Custom..." option. This custom option is useful for initial development/testing.

Note: When using the manual "Custom ..." option, settings do not persist for future connections and also cannot be saved as reference in Visplore sessions.
Import a Table or a View
Select your previously configured DSN in the welcome dialog to import data from a table.
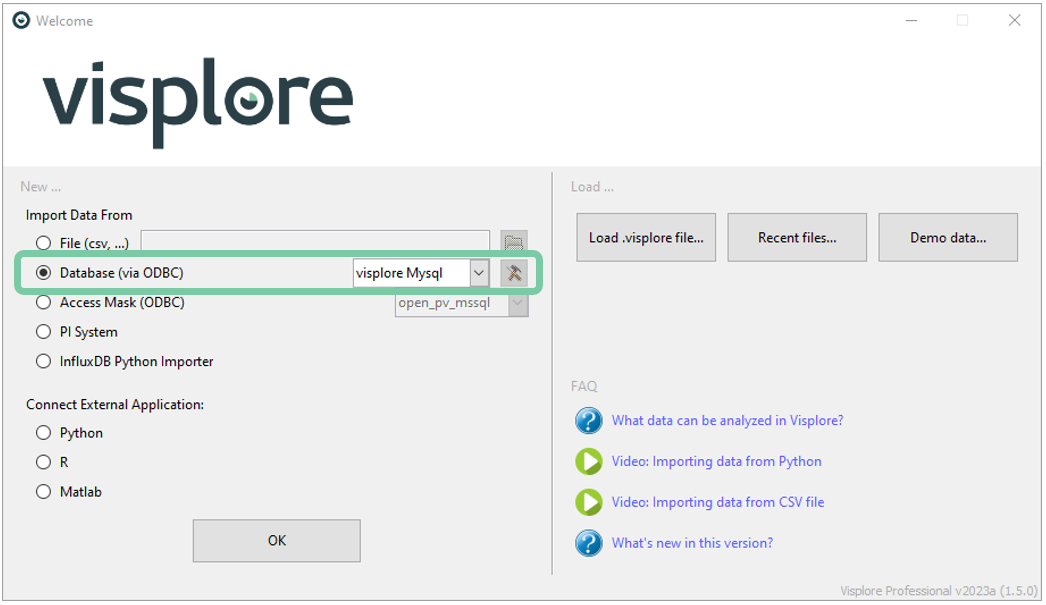
Clicking ok will open a dialog with options to further define your database query and a preview of your resulting data.
1. Navigate the database schema and select the desired table or view.
2. You can check the preview to peek into the data and change column types if needed.
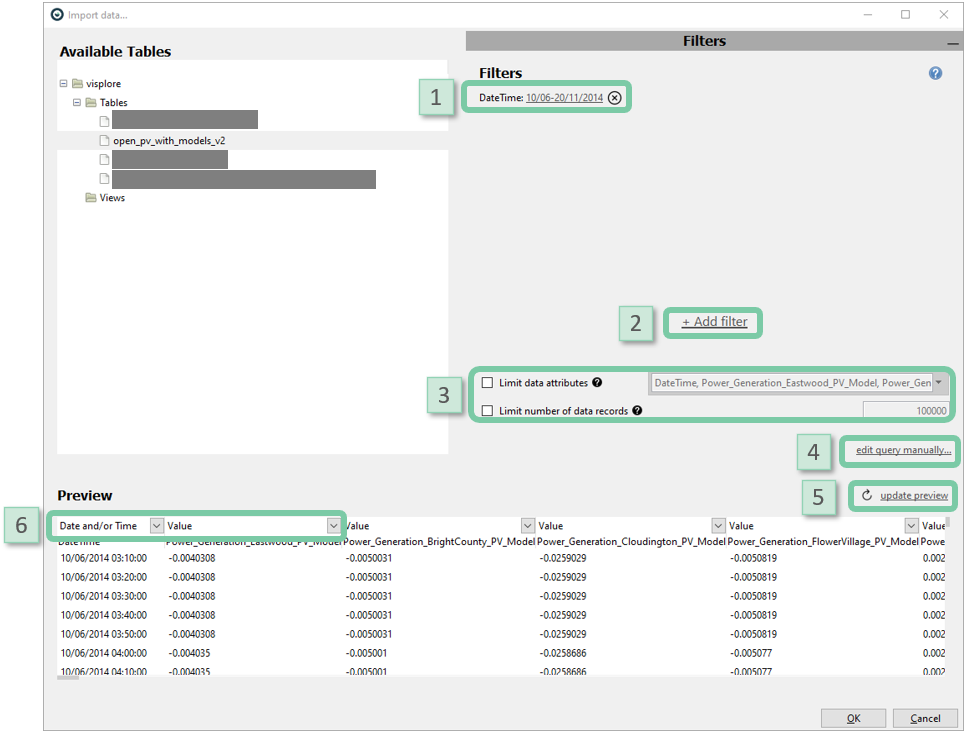
3. If you want to import all data, click OK. Otherwise, you can add import filters to reduce the amount of data you wish to import. To add filters click the filters panel on the right-hand side.

1. In the filters panel, you can see all filters you defined on your import. Clicking the underlined text lets you change the filter, the X button removes a filter.
2. Use the + Add filter button to add more filters. Depending on the data type of the data attribute you select, an appropriate filter comes up. Currently, time and categorical filters are available.
3. You can also limit the data attributes (columns) and data records (rows) to reduce the size of your import.
4. If a more specialized import option is needed, the edit query manually button lets you define your own custom query in the query language of your database.
5. Use the update preview button to show your filters’ changes on the loaded data in the preview panel.
6. You can still change the data attribute types if needed.
After clicking OK, the data gets imported, visualized, and you can start working like you are used to in Visplore!
Note: If you're wondering if your table format can be analyzed in Visplore, please look at this summary of supported table formats.
Pre-defined filtering options with access masks
Visplore offers the possibility to set up a filter dialog for end users for a table/view (a so-called Access Mask). This way, the end user does not have to navigate the whole database structure but instead can use selected tables as an entry point. In addition, the end user can be provided with user-friendly filters to import only selected data.
An Access Mask is defined through an XML file and offers the following possibilities:
- Time-based filters: Absolute interval or relative interval like "last 7 days".
- Categorical filters: Loading all records from one or multiple categories, such as a "Product type", or only records of "Good production", etc.
- Column filters: Select which columns to import.
- Row number limits: Limit to e.g. only the first 1000 records.
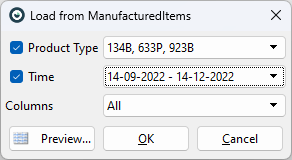
The user finds the Access Masks as a new option in the Welcome dialog once the corresponding XML definition has been created (see below). After choosing the access mask, credentials may have to be entered. After that, the mask dialog appears, where you can apply filters depending on your application. Finally, click OK to load the corresponding table, and the Visplore analysis can begin!
How to setup the XML configuration of access masks
An access mask is defined in an XML file. Use the following steps to create your custom access mask.
- Download the access mask XML configuration as a starting point.
- Save the XML reference file and place it in the correct location, as depending on your specific use case you have multiple options on where to put the XML access mask configuration. See Where to put ODBC access masks for details.
- Modify and extend the access mask XML configuration to your need using the documentation on the access mask syntax. We recommend using an editor with syntax highlighting such as Notepad++.
As you can see in the picture above, the access mask XML reference contains a filter for the time-period, a categorical filter for the product type, and no restriction on the columns (imports all columns). The reference for the access mask configuration looks as follows:
<odbc_access_mask id="ManufacturedItems" name="ManufacturedItems" odbcsource="PostgreSQL35W" database="visplore" schema="public" viewname="ManufacturedItems" order_by="Time">
	<timespanrowfilter id="Time" caption="Time" mandatory="no" dbcolumnname="Time" dbcolumntype="datetime" specification="absolute_or_relative"/>
	<categoricalrowfilter id="Product Type" caption="Product Type" mandatory="no" multiselection="yes" dbcolumnname="Product Type" dbcolumntype="string"/>
    <columns use="all"></columns>
</odbc_access_mask>
Important: Visplore must be restarted in order for it to detect the new access mask. Upon restarting, you see the new access mask in the welcome dialog. Depending on your DSN configuration and ODBC database you might be prompted for a username and password.

See the troubleshooting section below for common issues. If you have questions about this, please get in touch with us via Questions and Feedback. We are happy to provide you with details!
Setting up operational dashboards on live data
Databases usually contain fresh and up-to-date live data. Visplore allows to create analysis dashboards that work with this latest data. These dashboards can be used easily to monitor the latest production or quality data without any further setup effort. Furthermore, these dashboards can be shared among multiple users. Setup an operational dashboard on live data as follows:
Import your data using a configured access mask as described above. To see the latest data, you may want to use the relative time filter (e.g. "last 24 hours" or "last 7 days").
Configure your visualizations as needed.
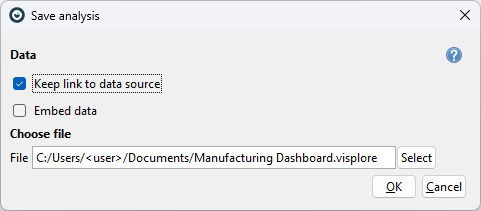
Save your analysis as a .visplore file by clicking  . Use the checkbox "Keep link to data source" when saving your analysis, as seen below. See the chapter Saving and loading the analysis for details.
Optionally, share this file with other users. Loading such an analysis (either by double-clicking on the .visplore file or through the Welcome dialog) allows you to adjust your query and filters in a dialog.

Note: When sharing a .visplore file with other users, they need to have the Access Mask configured, too.
When you change your Access Mask or your database schema changes, this usually results in a different data table. In this case, it might happen that out-of-date .visplore files throw a warning or not load at all. In this case, you can try to import your data with the new access mask first, and then apply the old .visplore file and select "apply to current data" when asked. Now save your analysis with a new file name, again with the "Keep link to data source" option.
Now you can perform routine analysis on your live data on a regular basis, thus operationalizing your analysis.
If you have questions about this, please get in touch with us via Questions and Feedback. We are happy to provide you with details!
Troubleshooting Access Masks
Troubleshooting the Setup of Access Masks
- Frequent issue: please ensure that the only file extension of your Access Mask is XML. It can happen that in Notepad or similar, you save the file unintentionally as an .txt file. If you leave the file filter on .txt when saving, this results in e.g. "mask.xml.txt", and Visplore does not recognize it. If in doubt, configure Windows to display the file extensions.
- Different masks must also have unique ids and captions ()<odbc_access_mask id="ManufacturedItems" name="ManufacturedItems")
- Your access mask does not appear in the welcome dialog? Visplore scans for Access Masks XML configurations on start only, so close or restart Visplore. Changes to the XML file do not require a restart of Visplore.
- If your access mask still does not show up in the welcome dialog or elements are missing in the dialog, it can be that you have errors in your XML file, such as wrong spelling of attributes, syntax errors like not closing an element, etc.
- If you don’t see any data in the preview or when loading: try to build up your file from a minimal functional configuration meaning without any filter and with "columns=all". Then add filters piece by piece to see at what point things go wrong.
Troubleshooting the Using of Access Masks
- If you need to wait a long time until your access mask appears after you selected it in the welcome dialog: This may be due to your categorical filter having too many categories. You can accelerate the loading time significantly by activating 1) local caching of categorical combinations (see "use_caching" in documentation on the access mask syntax for reference) or 2) save categorical combinations in a separate, materialized view and reference this (see "category_combinations_view" in the documentation on the access mask syntax).